Friday, December 11, 2015

Bendy Doll Tutorial

So about a year ago I bought some super cute bendy dolls from Bear Dance Crafts.  I wanted to make a little family of dollhouse dolls for my kids to play with but for the life of me I couldn't find much online about these specific types of dolls and how to enhance them.  Woolhalla does these amazing dolls with fabric heads but I wasn't *quite* that ambitious so I decided to come up with a more simple way to make them.  I also decided I'd share what I did just in case there's anyone out there who wants to be able to make a simple set off bendy dollhouse dolls.  :)

So far I've made three dolls, one of each of my daughters and one of myself.  I haven't yet made my husband, hopefully I'll get around to him soon!  This tutorial is going to be for the mom doll simply because her dress is easier to make, all other aspects of these dolls have been done the same.  Please note this is for the large doll base (5 1/2"), for the smaller doll you would simply need to shorten the dress a bit. 


The first thing I did was paint the feet.  I used acrylic paint and then sealed it off with a soy varnish.  You may have to do 2 coats of paint depending on how opaque you like it.


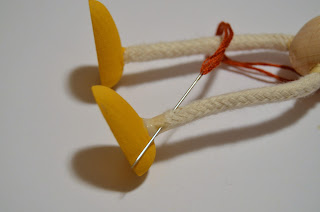
Next I cut a long piece of cotton embroidery floss, you'll want all six strands and a really long piece.  Thread them into a needle and take that needle and stick it through the leg of the doll, starting about a cm away from the foot and angling it to come out as close to the foot as possible.


Take that thread and start to wrap it around the leg, keeping the layers of thread as close to possible without overlapping.  Make sure to go over the raw end of the thread you inserted.  Keep winding around until you get to the top of the leg.


Once you get to the top, insert the needle back into the leg, aiming underneath the thread you just wound and coming out at a part lower down the leg.  Snip off the loose ends.


Repeat for the other leg.


Now do the same for the arms.


To do the hair, take embroidery floss and wind it around something stiff (a piece of cardboard, or in my case, a deck of cards :) ) that is roughly twice as long as you want the hair to be.  Wind enough to cover the head, starting at the forehead and going down the back of the head.  Snip the thread at one long edge.


I then took the thread and glued it to the head all over the crown, leaving the ends loose for ponytails.  I just used white Elmer's glue but I'm sure there are many other options.  :)


Print out the dress pattern and trace it onto a piece of wool felt.  Cut it out and pin it onto the doll.  Sew the dress together under the arms and along the sides.  Do a blanket stitch around the neck to keep it stable and sew together down the back.


Using acrylic paint, paint on two eyes and if you like, a mouth.  And you're done!  :)

Wednesday, September 30, 2015

It's almost October

And for me that means a chance to dress up in costumes!  Of course, I rarely actually dress myself up in costumes and my children are wanting to pick out their own now so where does that leave me??  Dressing up my dolls!  Be prepared to see some dolls in costumes coming along this month, I'd like to introduce you to my first three.  :)

First we have Sable.  I rarely do these little honeybuns with a full head of mohair because my entire aim for them was to try and keep them a little more affordable for people and these use up a lot more supplies and take a lot more time.  But she wanted to be a flapper girl and how could I resist giving her a full head of curly platinum hair?!  Answer: I couldn't.  So Sable was born. 

Normally she's a really sweet girly girl and dresses in pretty hearts and lace but for Halloween her saucy side comes out and she's head to toe black! 


Next we have Emery who came to me one night very quietly and told me she'd always wished to be a butterfly.  Luckily for her I was able to come up with a sweet pair of wings that she can hook onto her shoulders when she wants to dress up.  This way she can wear them with anything! 

 
Luckily for me Ally was an easy customer.  It took her a while to decide what she wanted to be but when she picked a black cat late one night, we got to work.  I think her fuzzy little mohair piggies are just the sweetest, don't you?
 
 
Sable and Emery will be for sale in just a couple of hours at Crafty Bastards!  Stay tuned to my Facebook page for more fun in doll land!

Monday, September 14, 2015

Honeybun Sweater Tutorial


I’ve been working on a sweater pattern for my little honeybun dolls and decided that I should share it in case some of you want to make your own!  This sweater is very small, knits from the top down seamlessly using circular needles and the magic loop method.

Yarn: Any medium weight yarn will do. 
Supplies: 4mm circular needles, waste yarn, stitch markers, a small button and thread, a sewing needle and a yarn needle.
Abbreviations:

K-Knit
P-Purl
sm-Stitch Marker
kfab-knit into the front and back of the stitch
yo-yarn over
K2tog: knit two together
 
Instructions:
Cast on 28 stitches using a long tail cast on.
1) Knit, place markers as follows: k5, sm, k5, sm, k8, sm, k5, sm, k5.

2) K2, yo, K2tog, knit to end.

3) *Knit to one stitch before marker, kfab, sm, kfab*, repeat 3 more times, knit to end.

4) K2, Purl to last 2 stitches, K2

5-12) Repeat rows 3-4

13) K to first marker, slip next 15 stitches onto waste yarn, K to next marker, slip next 15 stitches onto waste yarn, K to end.

14) K2, Purl to last 2 stitches, K2

15)  Knit

16-17) Repeat rows 14-15

18-19) Knit

Cast Off.

Sleeves:

Rejoin sleeve yarn picking up 3 stitches to close the gap under the arm.  Slip on stitch maker to show the beginning of the round.  Using magic loop method or dpns, Purl one round and then cast off.  Repeat for other sleeve.

Attach buttons.

And there you have it, your own little honeybun sweater!! 


Wednesday, March 25, 2015

Lolli

Almost every dollmaker I talk to has a favorite size.  Even though they love trying new dolls they always seem to come back to a certain size.  For me it's small dolls.  I love the big ones, you can get so creative in clothes and accessories, but to me there's something so sweet about a wee dolly.  Maybe it's because those are the ones my children love the most.

I decided that I wanted to try and make a very simple doll.  One that would be easy to dress and not have a ton of hair to fuss with.  This is what I came up with...  meet Lolli.


Lolli is the first of what I hope to be a few little 8" dolls that I'll be making.  She's a solid little doll with button jointed arms and a cap that is stitched on.  She also has a sweet little ruffly dress.  Lolli would be great to carry around because she's light and not very big.  She loves lots of snuggles and hugs.

I'm always looking for feedback so if this is the type of doll that you'd love to see more of, please let me know!  :) 

-Kristy


Thursday, January 8, 2015

From the Heart

I like to think that people can tell when something is made from the heart.  I hope they know that when I make something with my hands it's about a lot more than just whipping something together and trying to make a profit.

Take this little ballerina for instance.  I'm very new at felting but for some reason yesterday I just had a strong urge to create something new.  I put my kids to bed, poured a cup of tea and let my imagination come to life.

There's something so therapeutic about creation.  I'm sure it's not for everyone but for me it is.  The feeling of taking something as simple as wool or cotton and forming it into something entirely different.

I plan on making more of these little ballerinas because they make me smile.  I hope they make you smile too.  And thinking of the little girl who's about to get her as a gift for completing her dance classes makes me smile again.  Thank you to those of you who allow me to continue creating. 

xo, Kristy

Wednesday, January 7, 2015

Bye Bye 2014, hello New Year!

I'm not a big fan of New Year's resolutions but all the same, I've decided that one of mine will be to jot down some of the thoughts running through my head onto this blog.

The holidays were such a blur!  I took some much needed time in December to spend with my family and tried oh so hard to pry myself away from the sewing machine, though I did manage to create a few things and I'd love to share one with you.

Meet Piper.


She's the latest of my ever evolving jointed baby pattern.  In the past I've normally made smaller babies but decided to try my hand at ones that are a little bigger.  I'm constantly tweaking patterns and she was no exception.


Piper is about 13" long though seems a bit bigger as her legs are curled up.  She's such a great size for snuggles.  Not too big and overwhelming for kids but big enough that you can easily dress her.  My youngest daughter fell in love hard with this one, it took all of my might not to hand her over but I have a feeling I'll be making another for her birthday.  :)


I'm hoping to have a similar sized doll made for the beginning of February so if you have any suggestions for me on coloring, please comment below and let me know!  Thanks for stopping by and please wish Piper safe travels!  - Kristy


Tuesday, August 26, 2014

Blog Hop!

Hi everyone!  The amazingly talented Dot at Busted Button has nominated me to take part in this fun blog hop.  What better way to give a little TLC to my little blog?!

What am I working on?

Oh gosh it just seems like I'm always working on a billion things!!  Besides spending time with my wee ones and taking care of the day to day, I always have some projects on the go.  Mostly I work on them in the evenings when the girls are in bed.  Right now I'm working on a sweet little yarn haired doll and a spunky little zombie rag doll.  (I only have a really horrid cell pic of my current doll - please don't judge)


How does my creative process work?

I'm not sure if it's much of a process, haha.  I always have ideas floating around in my head of things I want to make.  They basically duke it out until one of them hops to the front of my mind.  Sometimes I stop by one of our local yarn stores and run my fingers through all of the yummy wools and one or two (or six) call my name.  Other times I browse my fabric stash and pull something out that I love and have probably been wanting to use for a while.  I'm constantly inspired by the creative people around me and the things they do, it fuels the little handmade fire inside of me.  :)

This is a continuous blog hop hosted by different artists/bloggers every week. In the next week or so, I’ll be passing the torch to two of my absolute fave Canadian crafters! I just have to decide who... :)